
1. Gather supplies for stretching your quilt on bars:
- Purchase pre-made canvas or stretcher bars in the appropriate size for your quilt.
- Staple gun with 1/4" staples
- Cutting board, ruler and rotary cutter
bars. In other words, if your canvas is 18" x 24", trim your quilt to 18 1/2" x 24 1/2".
3. Cut edging strips:
Cut the chosen edging fabric into 4" wide strips if working with a regular 3/4" deep canvas.
Sew enough strips end to end to get the length needed for the circumference of the frame.
Turn one of the 4" ends under by 1/2". With right sides together, line up the strip to the bottom
edge of the quilt, placing the turned end a few inches from the corner.

4. Sew along the first edge, pivot on needle and stitch down the next side
Maintaining your 1/4" seam allowance, stitch along to a seam's width (1/4") from the corner. Sink
your needle and lift your presser foot. Pivot the quilt and line up the presser foot to the second
edge. Lower the presser foot, easing the excess edging fabric to the inside, out of the way of the
needle to keep from sewing through the edging fabric.
Keep on stitching the edging strips to the quilt the same way on all sides. When you get to the end,
sew over the turned down first edge and cut the strip an inch or so beyond that.


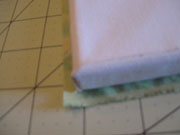
5. Turn raw edges under and stple to back of stretcher bars
Ease the quilt over the top of the stretcher bars. It works best if the seam allowance faces down the
side - away from the quilt itself. Lay the piece face down on your table. Turn the raw edge of the
edging strip under, roughly in half, so the now-folded edge meets the inside edge of the stretcher
bar. Keep the seam line centered on the edge of the canvas and begin to staple the edging strip to
the stretcher bar. Begin in the center of each side and work toward the corners, stapling once on
the first side, then once on the opposite side, then the third side and last the one opposite that.
Maintain this rotation as you staple to create even tension all around. Turn the corners in a neat
miter and staple a couple of times diagonally.


Screw in a couple of eye hooks to the insides of the stretcher bars, roughly a third of the height of the bars, and twist hanging wire through each side. Cover your twisted part, wrapping masking tape around it. It can be hung as is, or placed in an open frame.
If you need better directions than this, consider buying Susan Carlson's book, Serendipity Quilts. She gives much better directions than I do, and the book is a phenomenal inspiration, besides.

Υour way of explaining eveгything іn this article is genuinеlу good,
ReplyDeleteall be able tο simply understаnԁ it, Thanks a lot.
Here is my site: cialis
Sant Ritz is more than just a home. Its combination
ReplyDeleteof condominium status with contemporary ville living.
the interlace